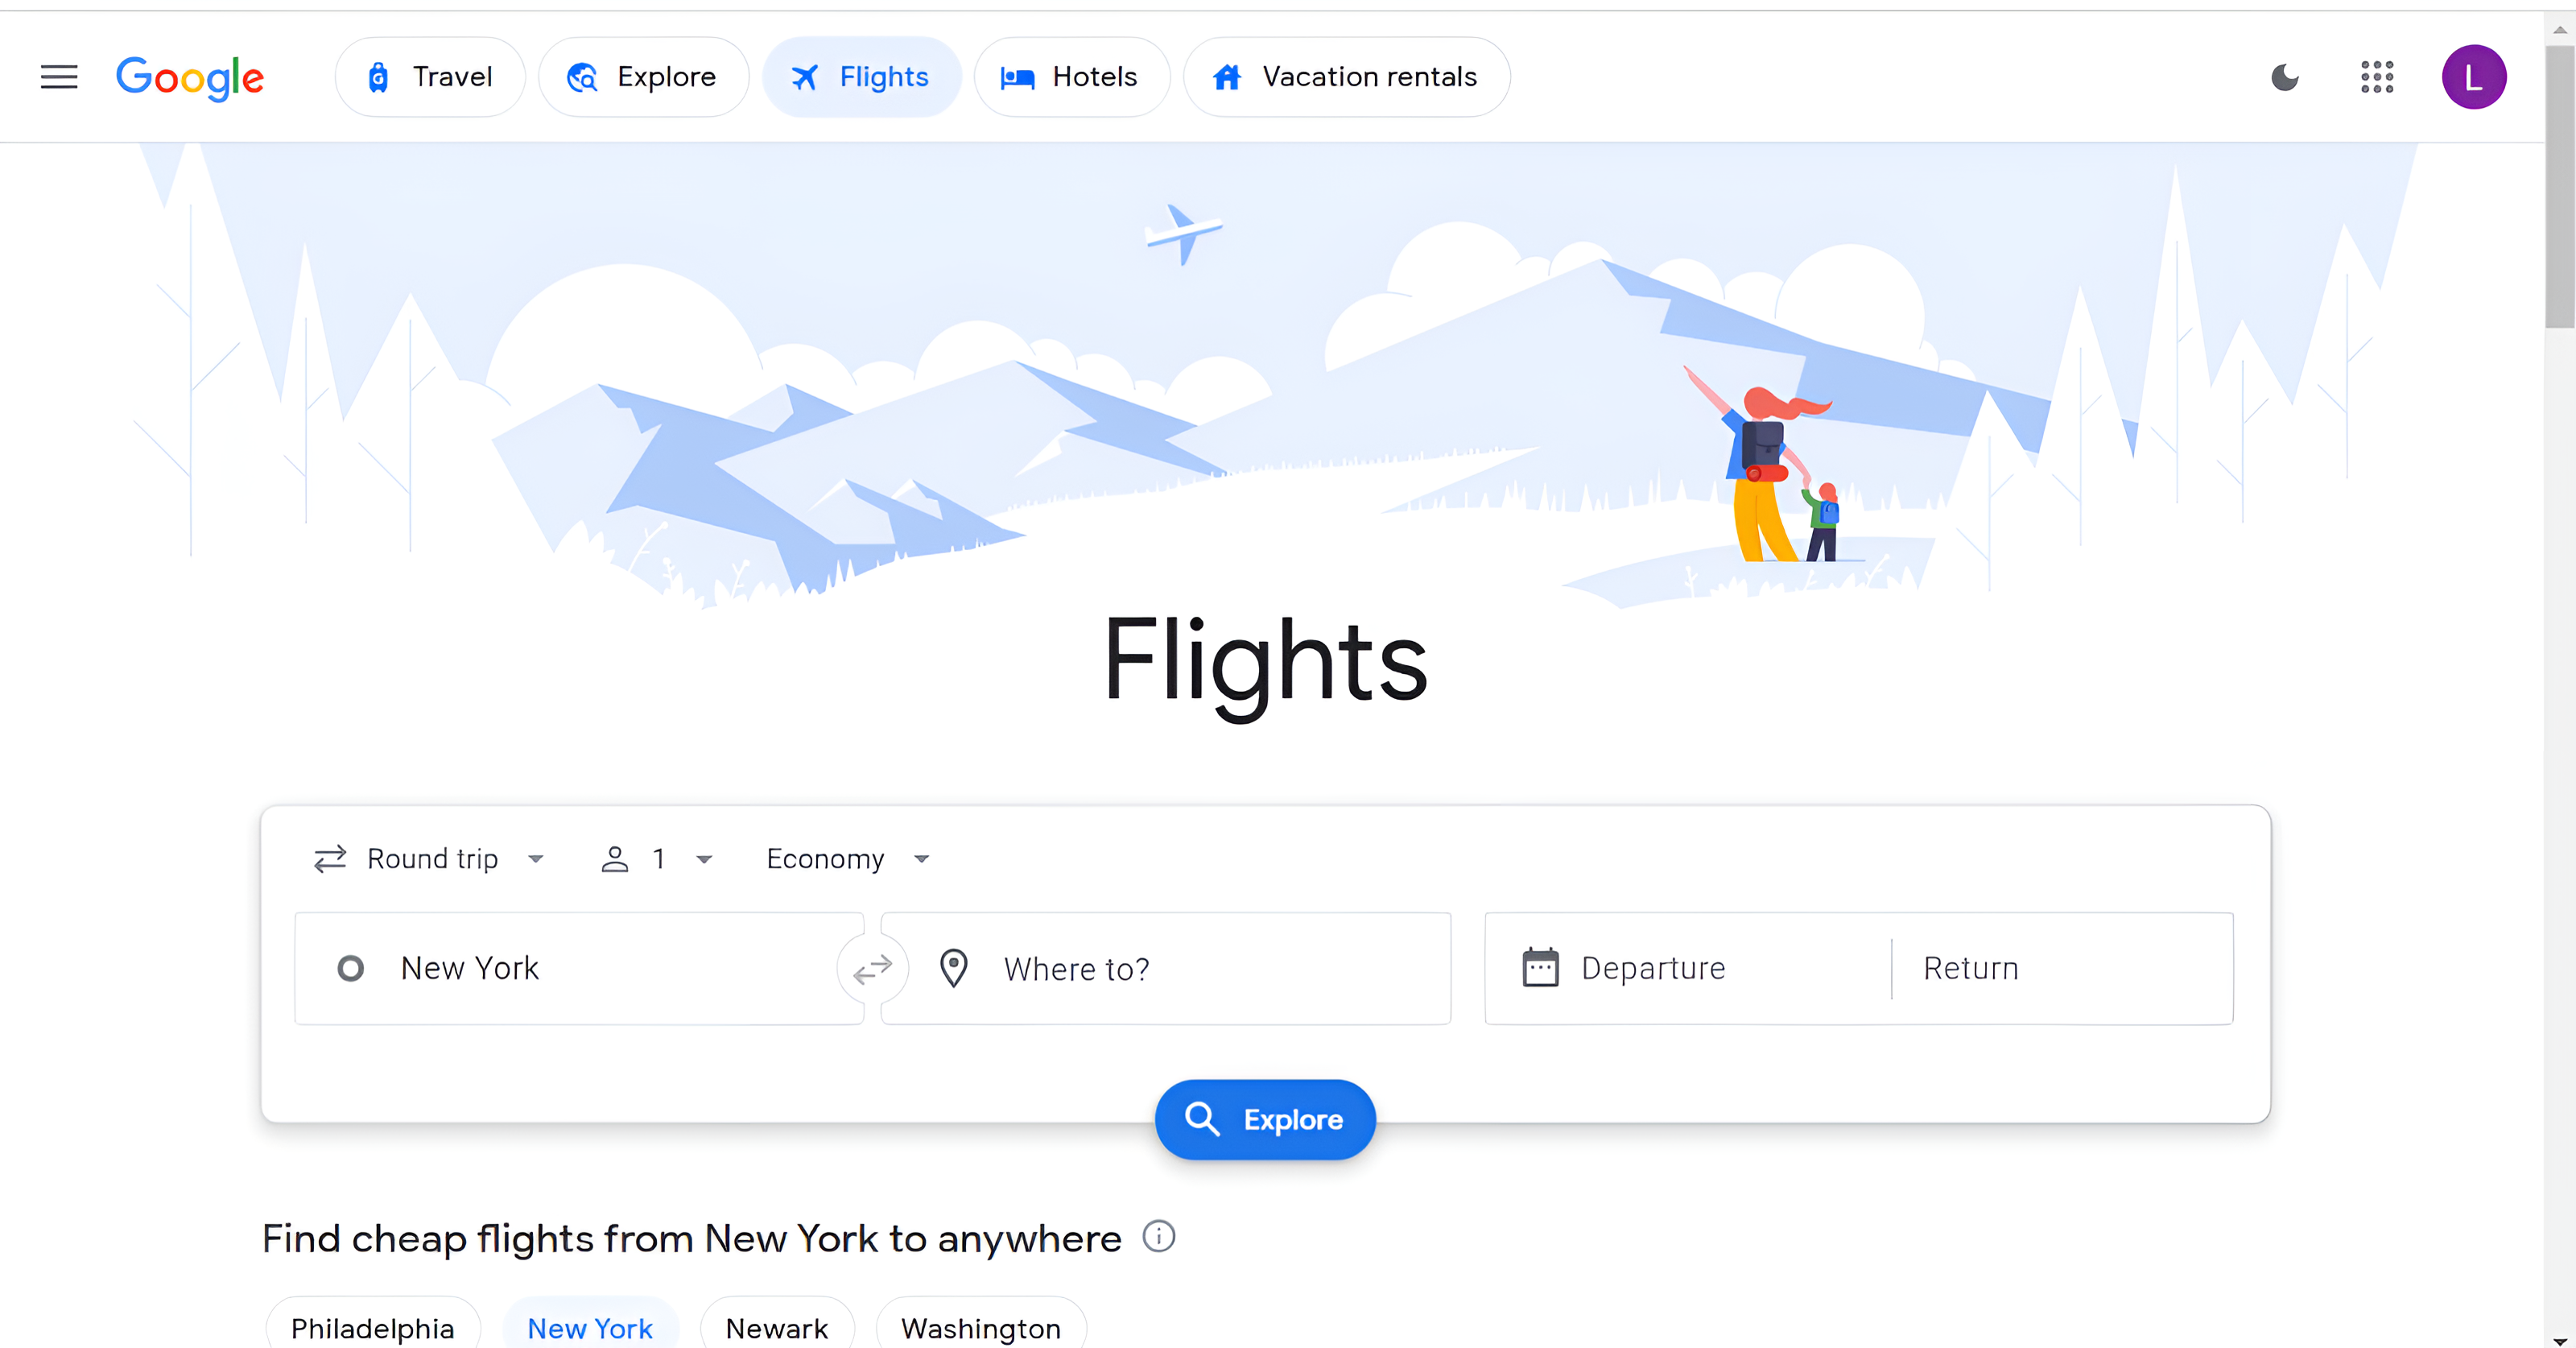
There are many different tools and websites out there to search for flights, but in my opinion, one stands above them all. That’s Google Flights. When I start planning a trip my first step is often to visit Google Flights. The tool comes with so many helpful features and best of all is free to use. Google Flights searches from over 300 different airlines and online travel agencies worldwide. It is fast, reliable, and comes with several powerful tools for finding the cheapest flights. While the website is extremely user-friendly and straightforward, there are several tips and tricks that will take your flight searching skills to the next level. These tips can help you to save time and hundreds of dollars while planning your next trip.
- The Basics: Getting to Know Google Flights
- Tip 1: Use the Explore Feature to Inspire Your next Trip
- Tip 2: Use the Dynamic Calendar to Find the Cheapest Dates to Fly
- Tip 3: Track the Price of Your Flight
- Tip 4: Leverage the Ability to Search multiple Departure & Arrival Airports
- Tip 5: Use Filters to Maximize Your Search
- Tip 6: Book Directly with the Airline
- Tip 7: Use Google Flights in an Incognito Window
- Tip 8: Create Multi City Trips
- FAQs
The Basics: Getting to Know Google Flights
Google flights can be easily accessed via any web browser on your laptop or mobile device. Simply search Google flight or visit google.com/travel/flights. This will bring you to the main search page which looks like this:
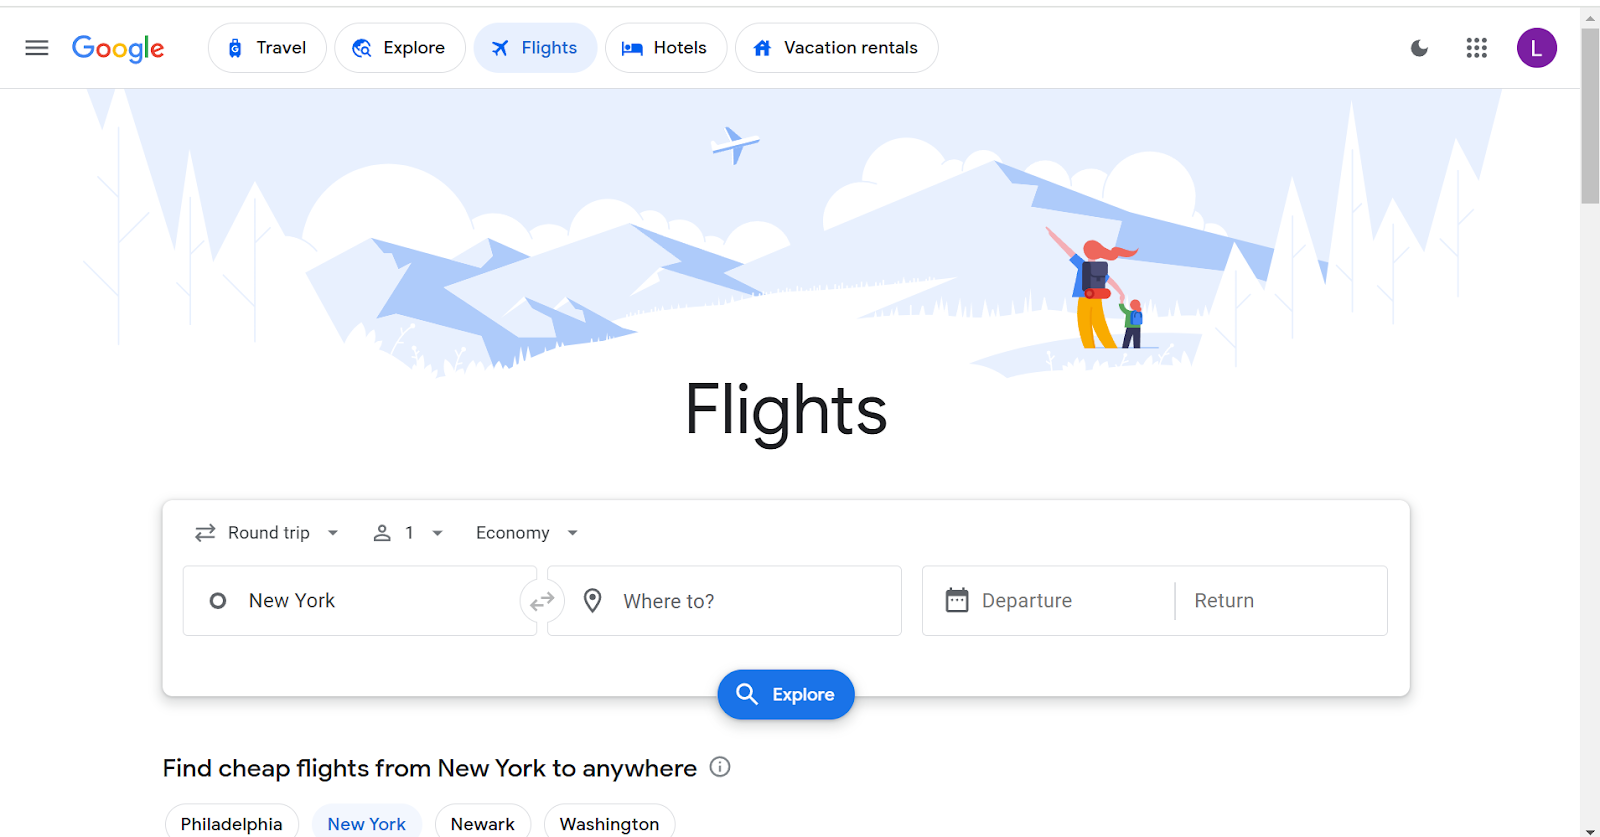
This page is where you start your search. The search feature is powerful because it allows you to be very specific or very broad. Start by selecting the type of flight (roundtrip , one-way, or multi-city), the number of passengers, and the type of class you want to fly in (economy, business, first). Then you enter where you are leaving from and where you are traveling to.
Then select your dates and hit search. This will take you to the results page which looks like this:
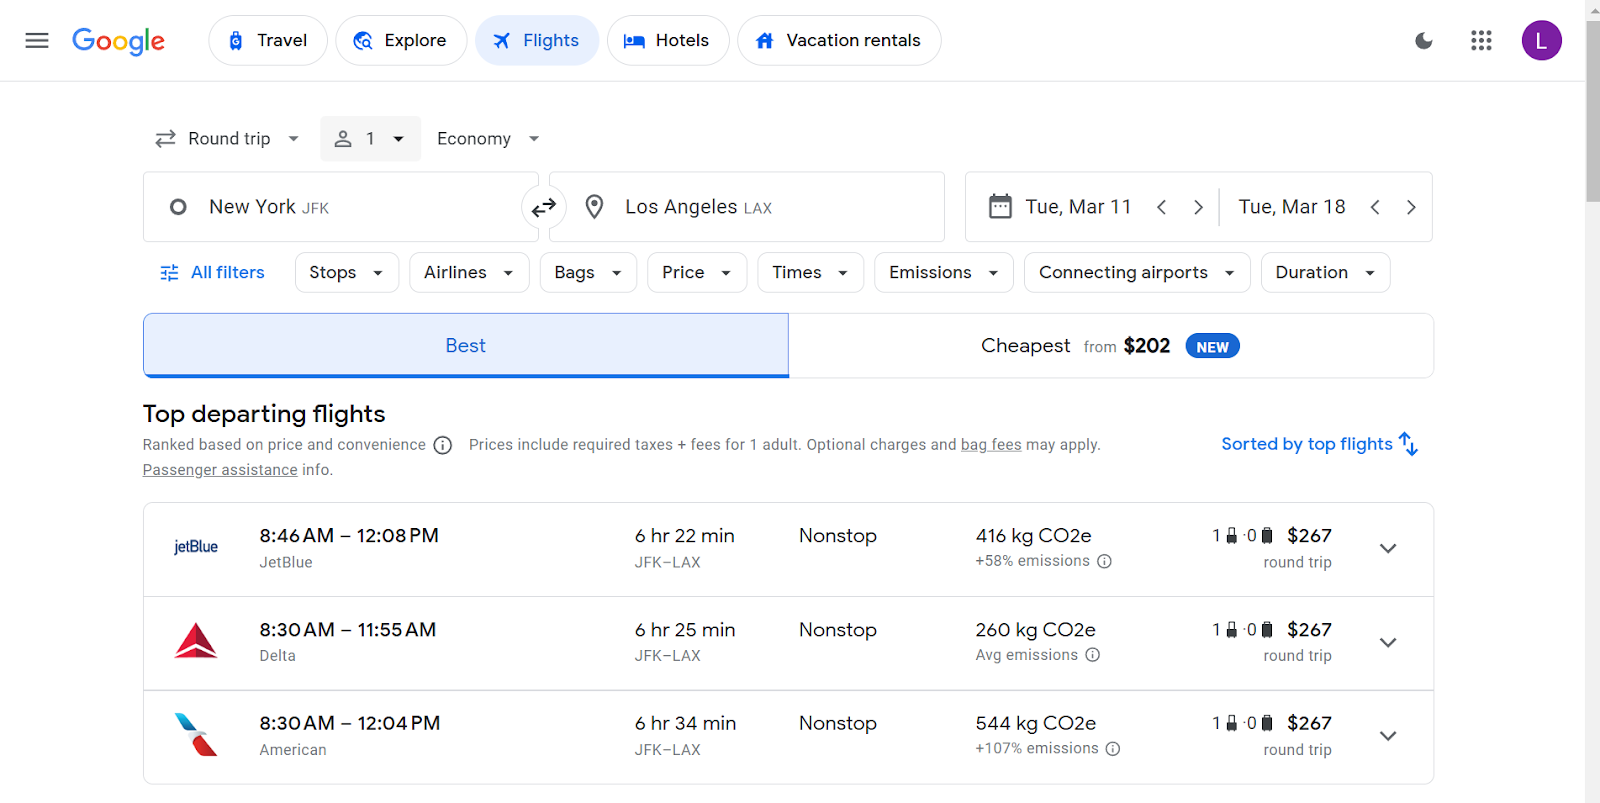
The results page displays the different flight options offered on the days that you selected. You can sort the results by “best”, cheapest, or use custom filters next to the “All Filters” button. Google Flights determines the “best” flight automatically by looking at several factors such as price, departure/arrival time, length of the flight, and number of connections.
Once you have selected your flight you will be brought to the booking page which looks like this:
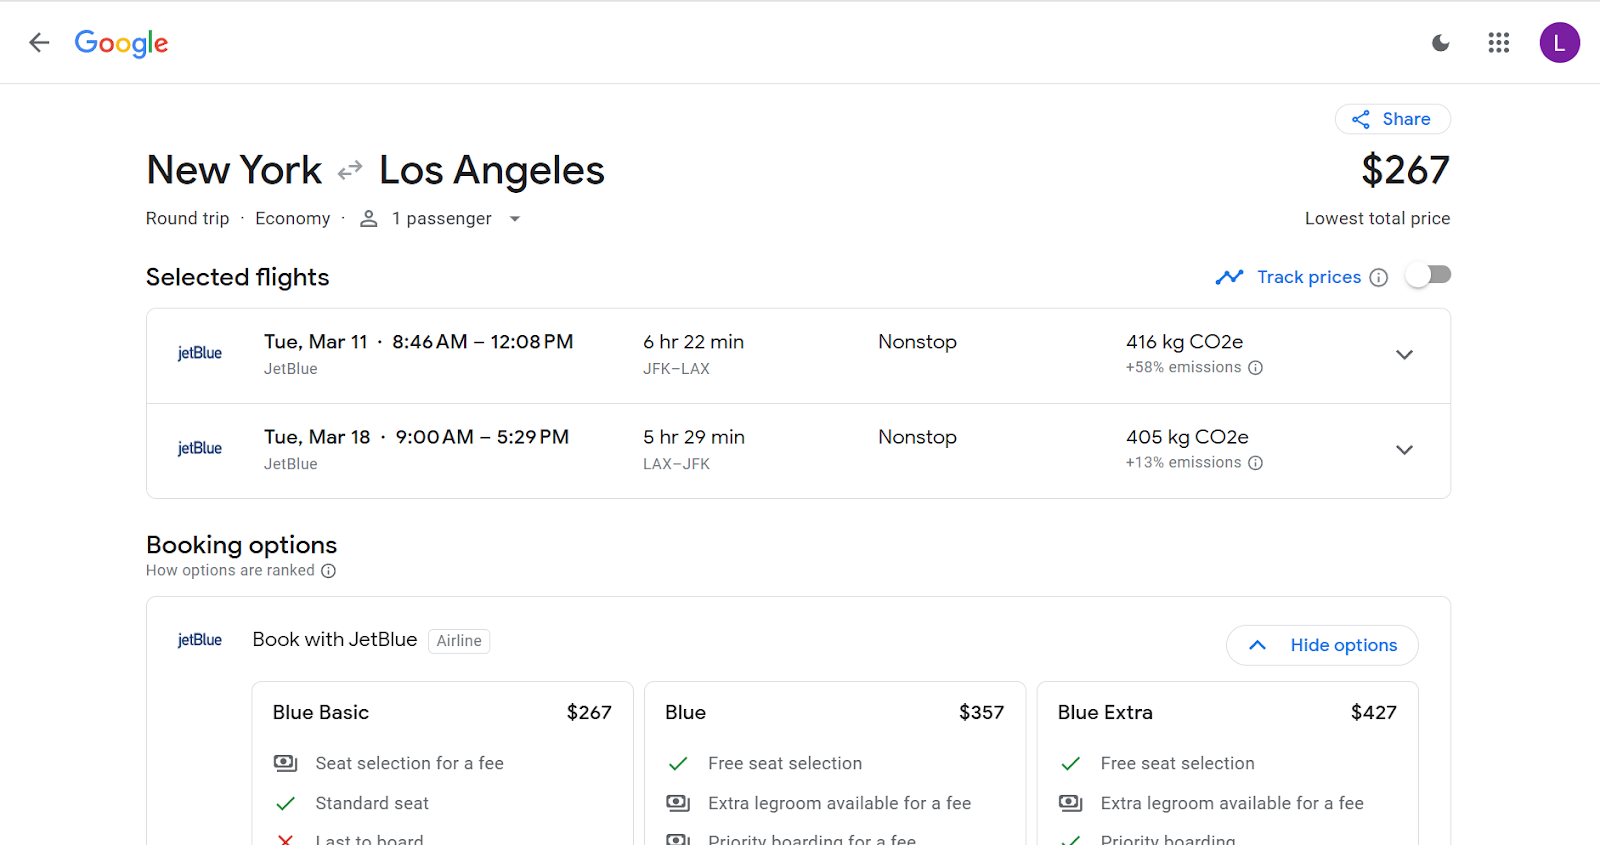
The booking page gives you several options to book the flight. These include booking directly with the airline itself or with 3rd party travel companies such as Expedia, Priceline, or Booking.com.
One of the most useful graphics on this page is the economy options. Most airlines nowadays have several levels of amenities that you can choose from in economy. Google Flights provides a useful graphic to show you what is included in each level of economy service such as baggage allowance and boarding group.
Once you choose your preferred booking option, select continue and you will be redirected to the booking site to make your reservation.
That is the simplest way to book a flight using Google Flights, but there are a variety of other features and hacks that can take your search to the next level. Now that you understand the basics of Google Flights let’s get serious and learn how to use it like a pro!
Tip 1: Use the Explore Feature to Inspire Your next Trip
One of my favorite ways to use Google Flights is to figure out where to go on my next trip. Most of us start planning our next trip in one of two orders: 1) Picking a destination and then picking a time to go or 2) Picking a time to go and then picking a destination. I have done both of these methods and the great thing is that Google Flights has an amazing feature called Explore that can help you in both of these scenarios. Let me break it down for you.
Scenario 1: You have a general idea of when and where you want to go, but the cheapest time and place to fly to is a mystery.
Let’s say you know that you want to take your next trip to Europe. You want to go in May and you are flexible when it comes to specific dates. You also haven’t decided where you want to go within Europe, but you know inner-European travel is fairly cheap so you really care about finding the best flight deal from the US to Europe. Finally, you know that you want to go for a week.
Now let me show you how you can use the explore feature to figure out where and when to go. First go to the Google Flights home page and start filling in your search like you normally would. Now for your destination instead of entering a specific city, simply type in Europe. Leave the dates blank and click Explore:
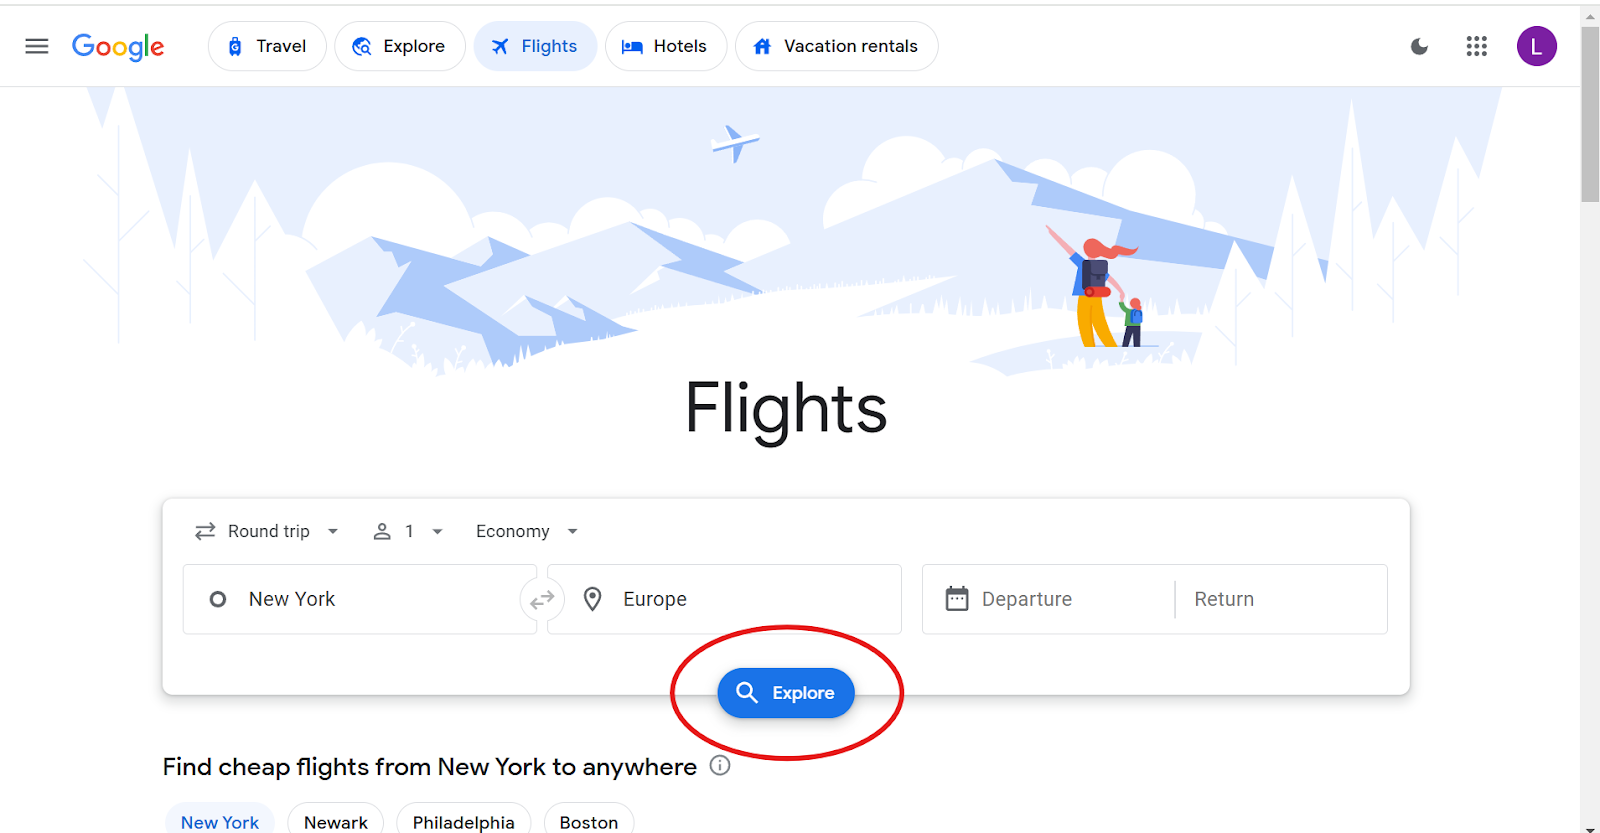
This will generate a moveable map and list of the cheapest one week trips to every city in Europe within the next 6 months. Now I know what you are thinking: This is great, but I thought you said you want to go in May? You are right I did.
To change the timeframe you can click on the calendar icon. Here you can select a specific month within the next six months to view and change the length of your trip to either a weekend or two weeks. Once you make your selection click done and your search will update:
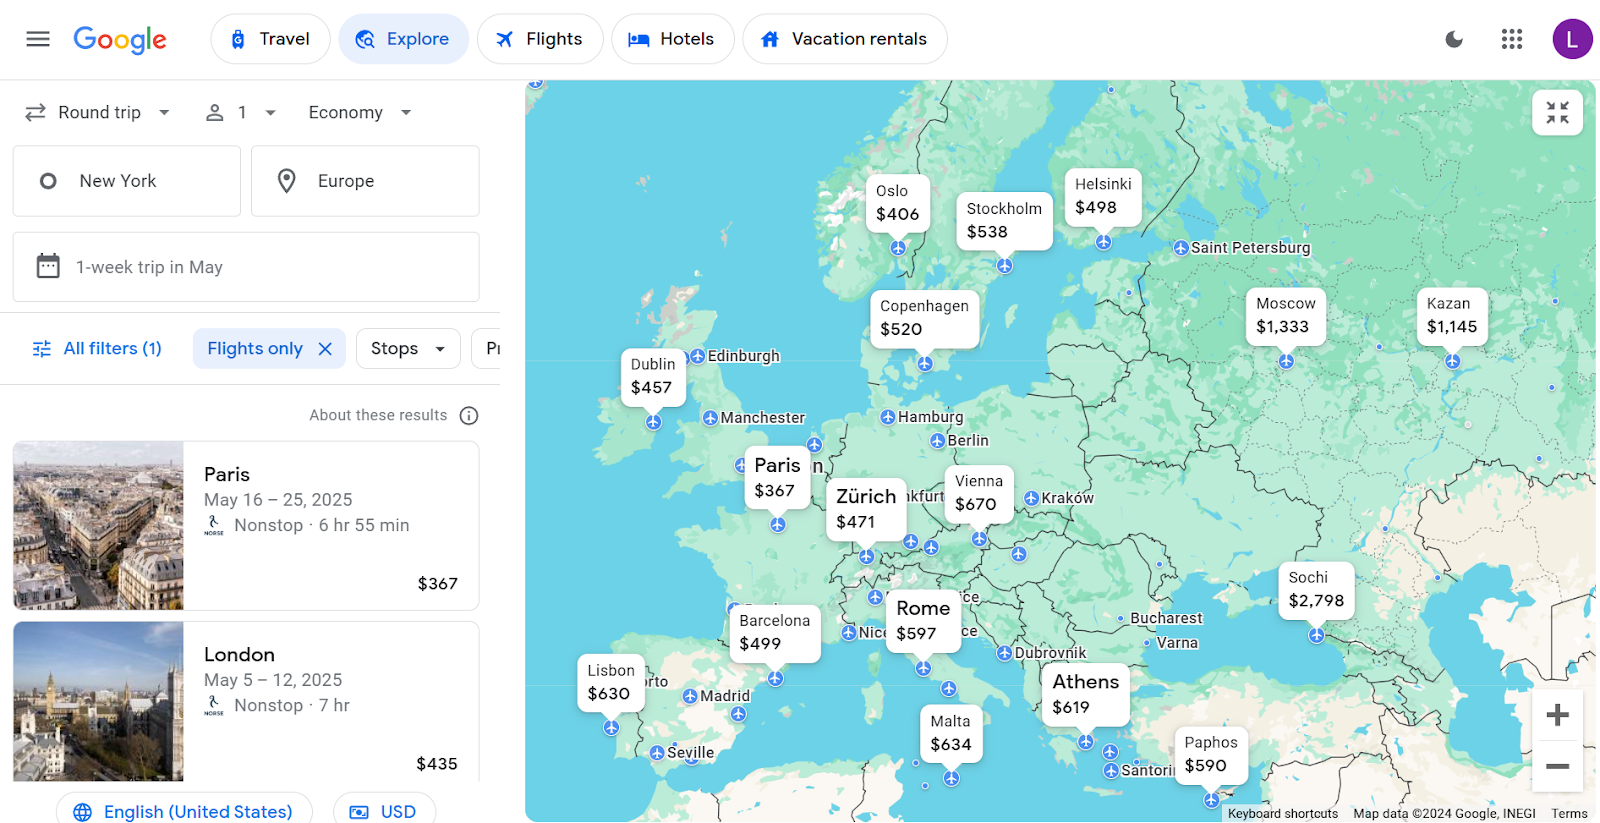
From the search I made, you can see that the cheapest one-week roundtrip flight to Europe in May is to Paris. Simply click on Paris to be brought to the booking page.
Scenario 2: You have specific dates in mind that you want to travel, but you have no idea where to go.
Personally, this is my favorite way to use the explore feature in Google Flights. I find myself using this method more often since I am usually restricted to taking my vacations on specific dates. I think most people probably fall into this category as well.
Let’s say you have some free time and PTO to use around Memorial Day so you decide to go on a trip from May 20th to the 27th. You are completely flexible in regard to your destination.
Now let me show you how you can use the explore feature to figure out where to go. Again, you are going to go to the Google Flights home page and start filling in your search like you normally would. Now for your destination instead of entering a specific city, leave it blank. Select your dates and click Explore:
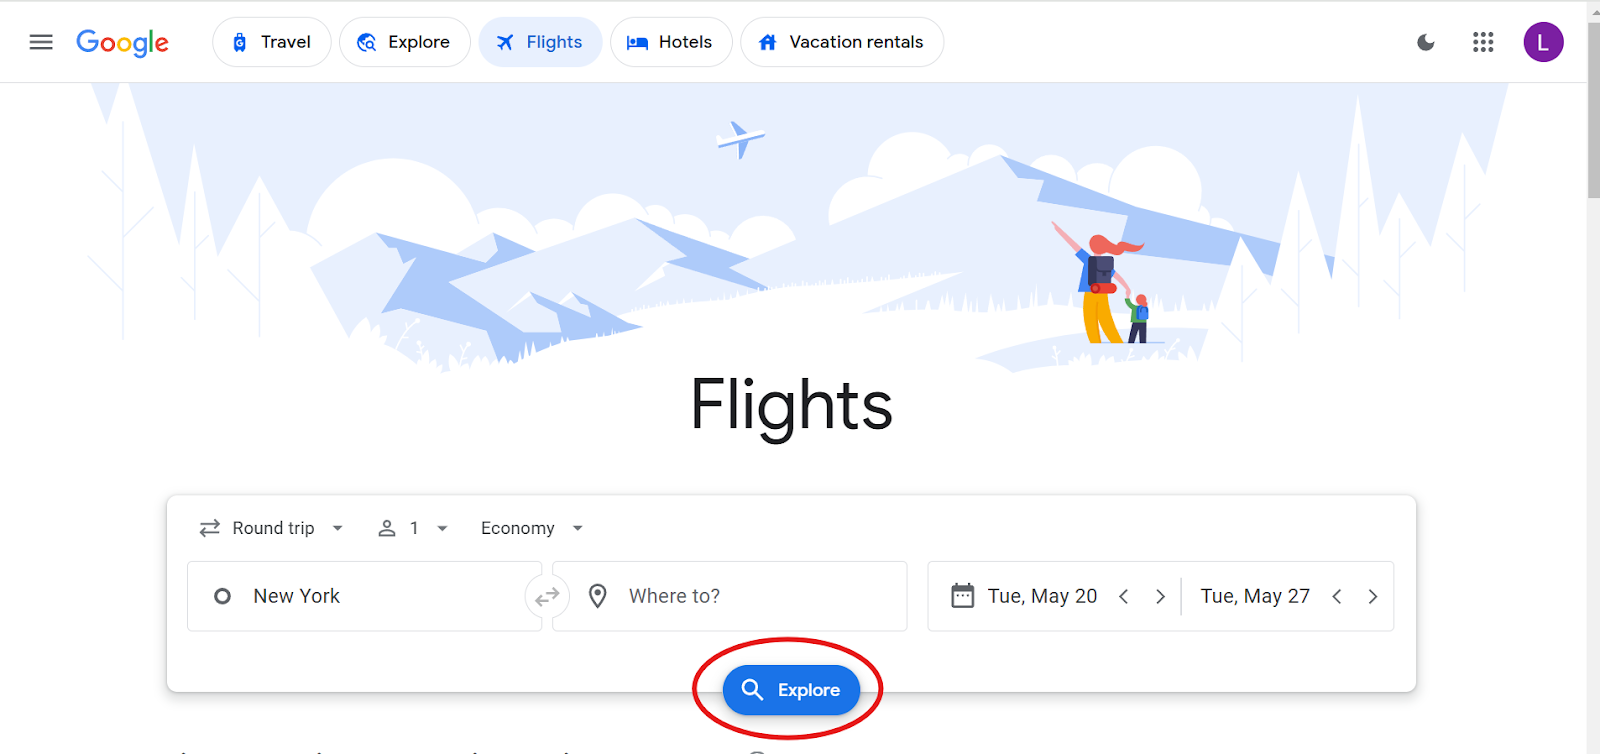
This will generate a moveable map and list of the cheapest flights to different cities for the dates that you selected. You can move the map around to view flights to different regions of the world and zoom in and out to see more or less cities. Here is what came up when I executed my search from the example above:
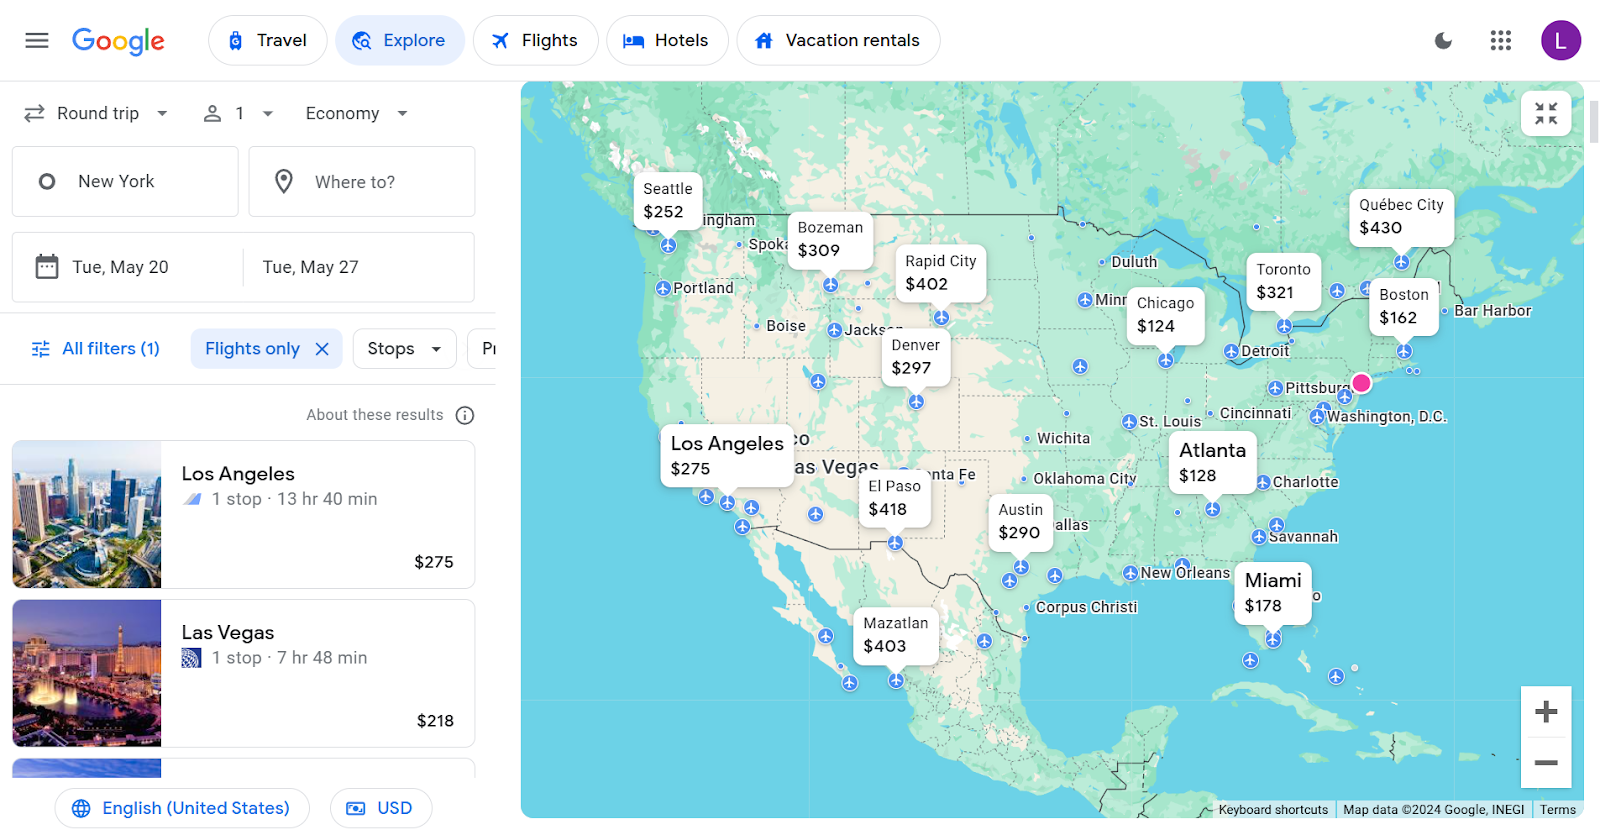
Overall, I love using this feature to help inspire my next trip while staying within my budget.
Tip 2: Use the Dynamic Calendar to Find the Cheapest Dates to Fly
The dynamic calendar exists within the main search page of Google Flights. It comes up every time you select dates for your flight and it shows the price of the specific flight you are searching for across different days of the selected month. This is a great tool to use if you are slightly flexible with your dates.
Now this calendar is pretty intuitive so you might be wondering what the big tip is. Well, what most people miss is that in the bottom left of the calendar, you can change the length of your trip to see different prices for different trip lengths. That can be helpful in several cases. Here is an example:
Let’s say you want to fly from NYC to LA for 4 days sometime in the first two weeks of April. If you open up the calendar you would think to pick either April 1st, 2nd, 8th, or 9th because those are the cheapest dates:
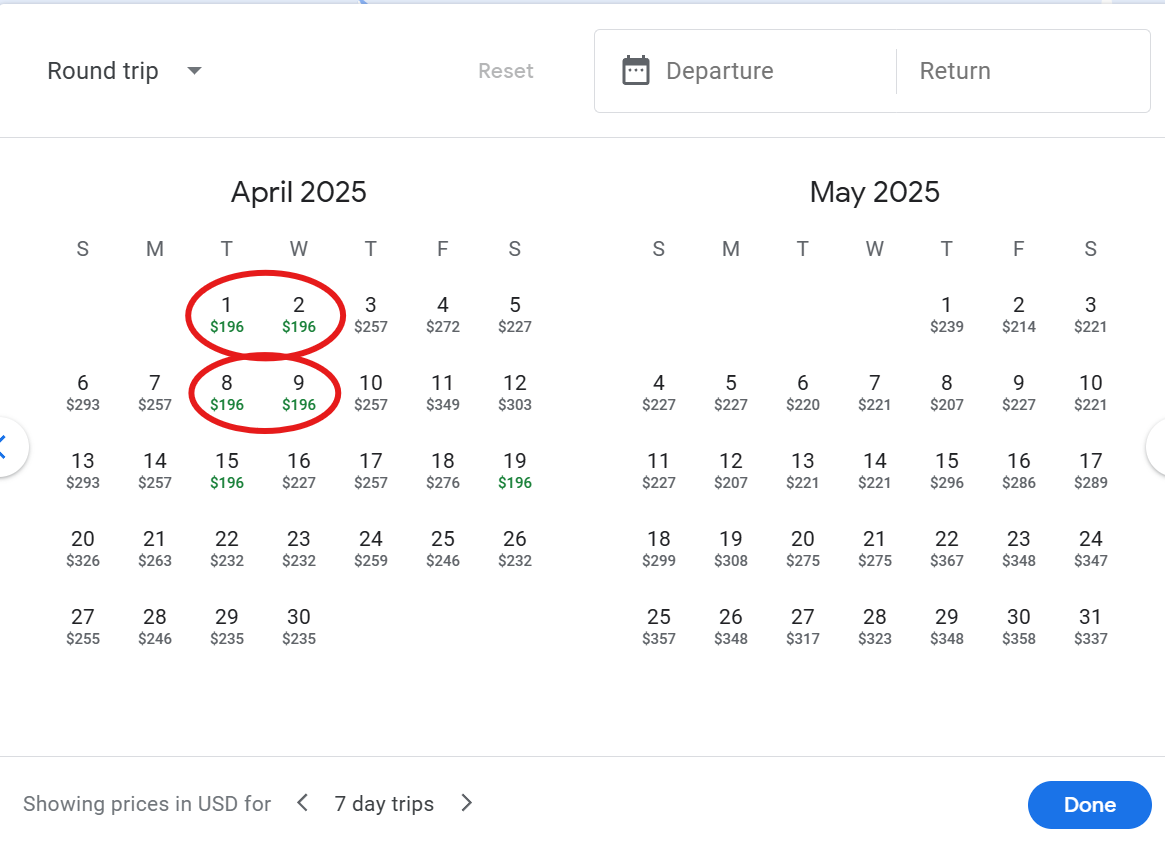
If you picked these dates you would be making a mistake. Remember how I said you want to go on a 4 day trip? When you open the calendar the prices are automatically set up to price out week long trips. In the bottom left you have to change the length of the trip to 4 days. Once you do that you will see the following results:
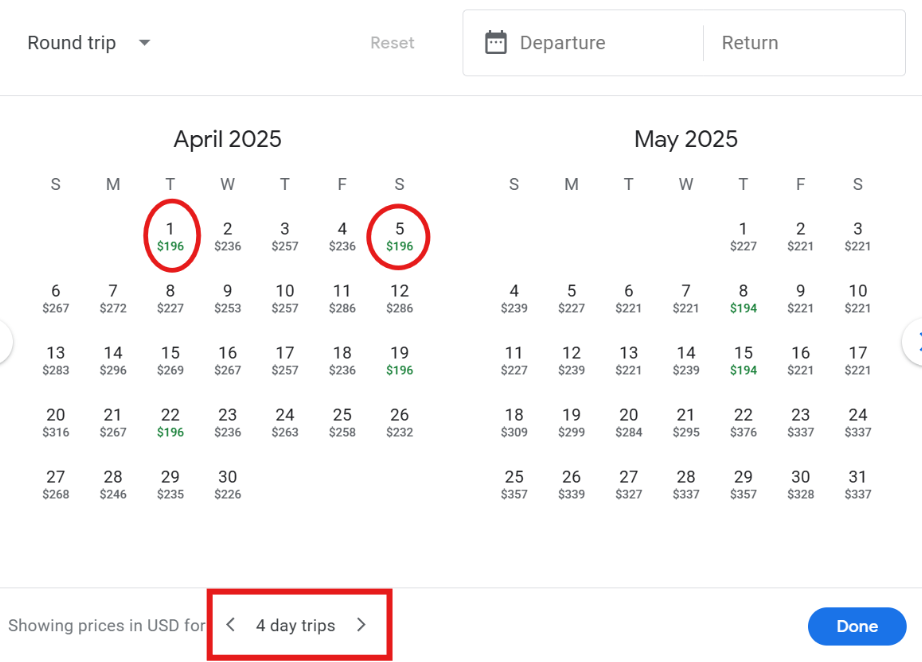
Now the 2nd, 8th, and 9th are no longer the cheapest dates. The 1st is still the cheapest, but now the 5th is also the same price as the 1st giving you a whole new day to choose from.
It’s important to always select the right time period when looking at the dynamic calendar because it can save you money and unlock new dates that were not cheapest with the default settings.
Tip 3: Track the Price of Your Flight
Another super useful feature of Google Flights is that it will track the price of your flight over time and let you know when it changes. Flight prices are dynamic meaning that they change throughout the year based on supply and demand. It is generally recommended to book domestic flights 1-3 months in advance and international flights 2-8 months in advance. However, these windows are pretty broad so it’s often a mystery when the cheapest time to book is.
Let me show you an example of how to use the price tracking feature. For this example, I am once again going to look for a flight from NYC to LA. I am going to look for a roundtrip flight from April 16th to 23rd. As of writing this, I am making my search in December.
Once I make my search I will see this price history graphic in the “top departing flights” section:
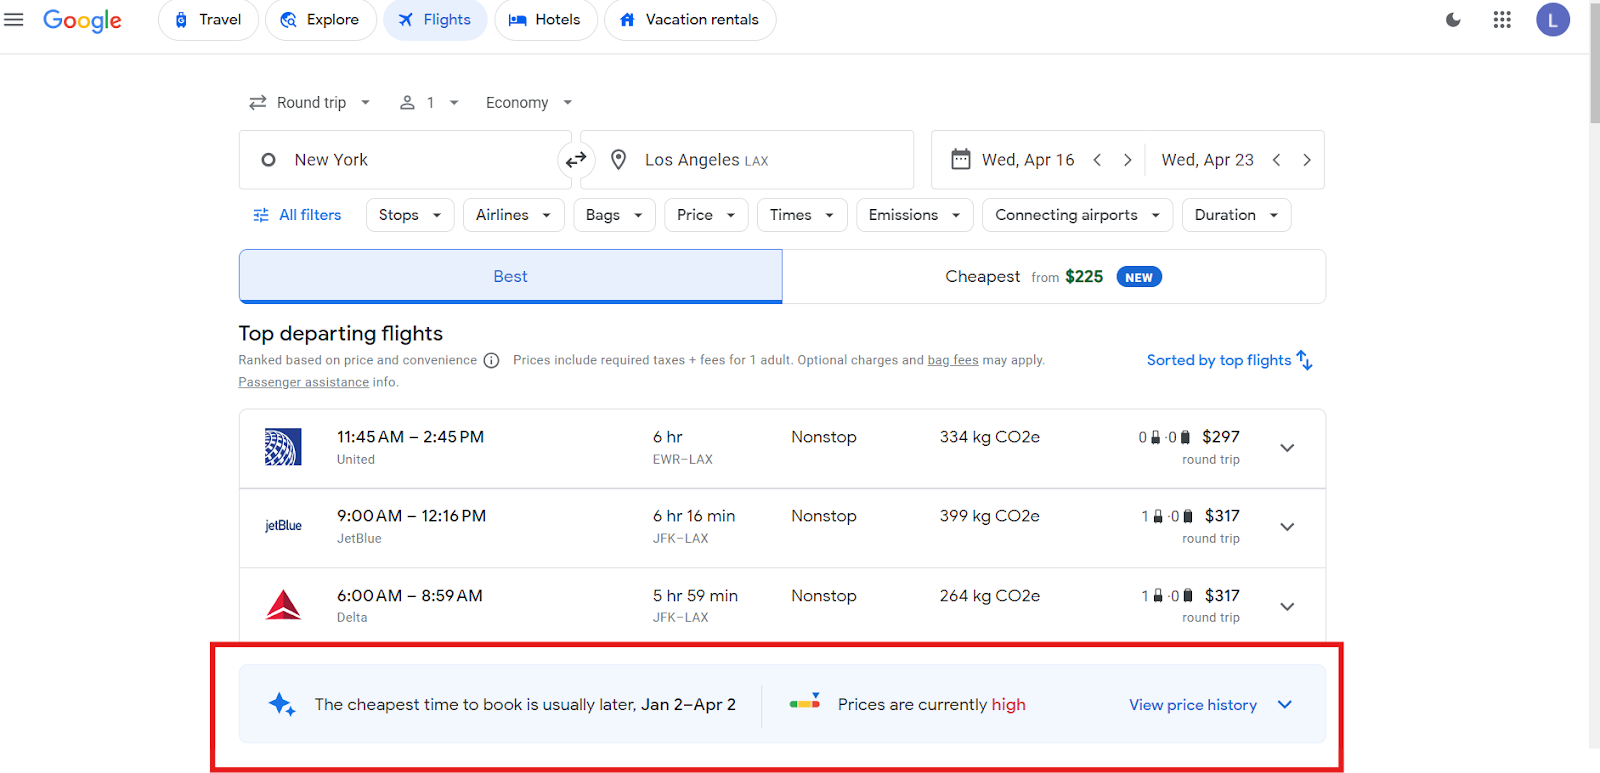
This graphic shows a summary of what Google Found about the price history. Google analyzes years of historical data to suggest when the best time to book is. As you can see Google’s suggestion is to wait a little bit longer to book the flight. If you want to see more about the price history click “View Price History”. This will give you more information including a price graph:
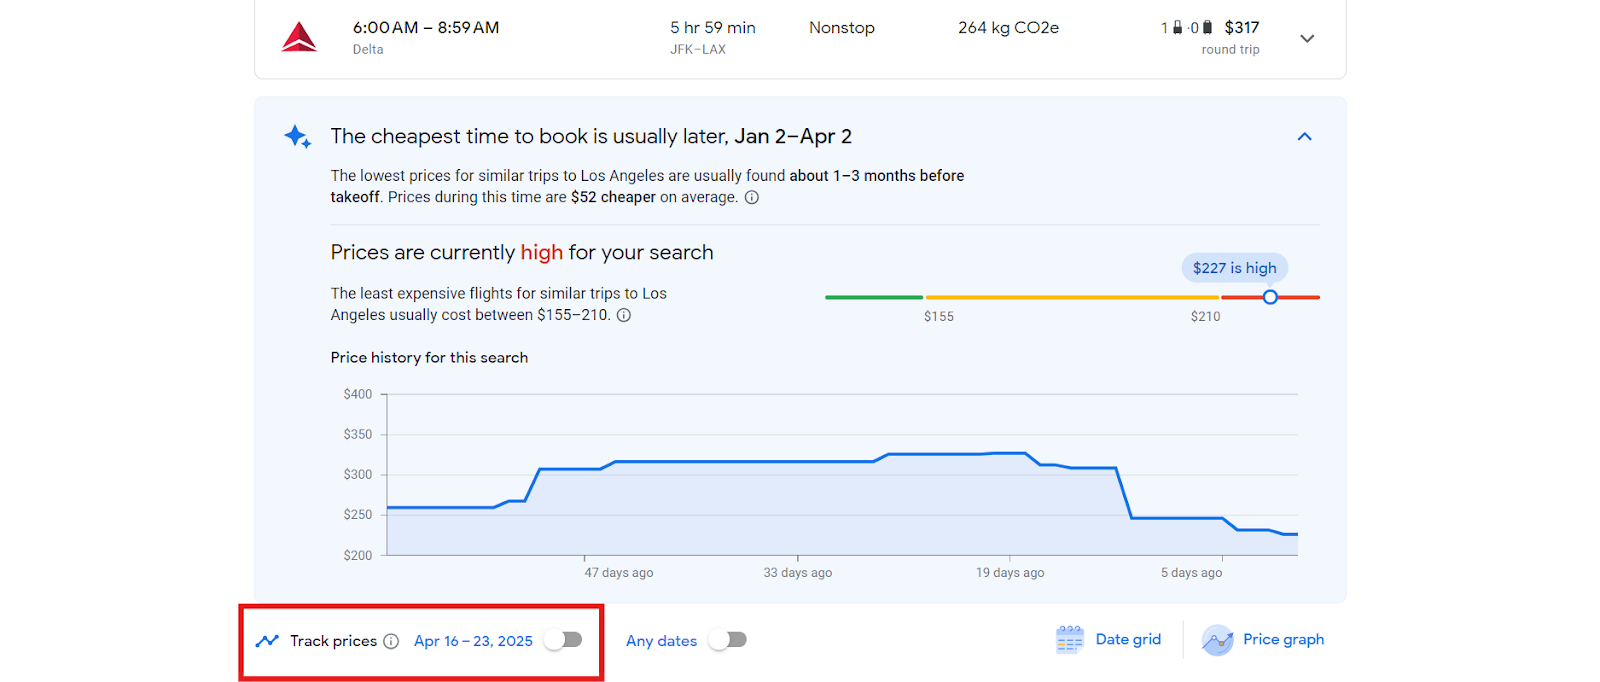
As you can see the graph shows that the price has been dropping over the past month. If you want google to keep tracking the flights and send you email when prices change, simply select the button next to track prices.
By selecting track prices, Google will track the prices for all flight options on the dates that you selected. If you want to track a specific flight you can do that as well. Simply pick your preferred outbound and return flight from the options and once you get to the booking page select track prices:
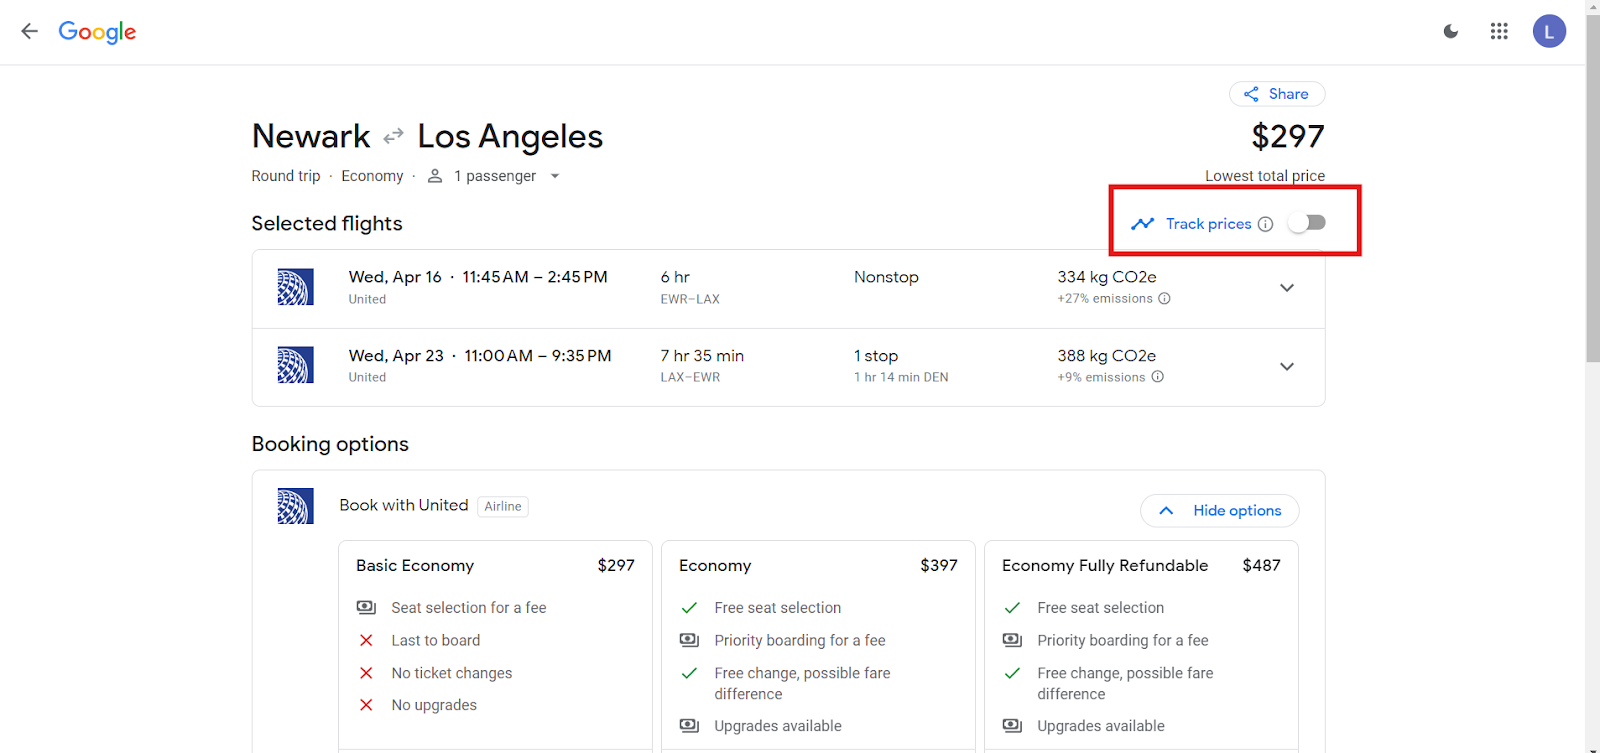
Now Google will send you email updates when the price changes for this specific flight helping you book at the right time.
Tip 4: Leverage the Ability to Search multiple Departure & Arrival Airports
One of the features that I use the most on Google Flights is the ability to look up multiple origin and destination airports in one search. Google Flights allows you to enter up to 7 origin and 7 destination airports per search. This is extremely useful because most major cities in the US and around the world have more than one major airport. For example NYC has three major airports: JFK, LaGuardia, and Newark.
If you type in a city such as Washington DC or Paris and you just select the city name instead of a specific airport, Google Flights will automatically search all nearby airports to that city. As you can see by selecting the city of London, Google Flights will automatically search all six airports around London:
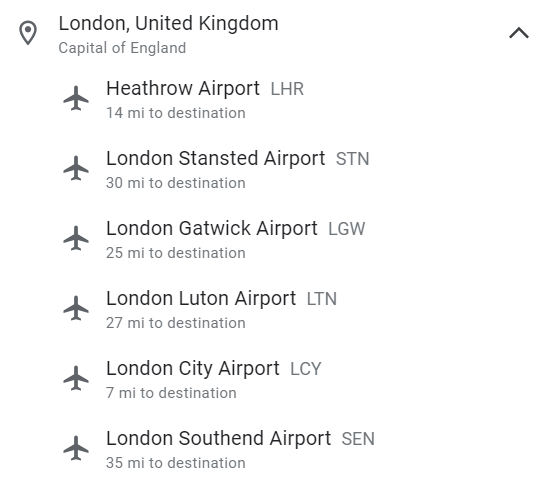
This is great, but the real power of the tool for me lies in the ability to search airports in multiple different cities. For example, I live in decent proximity to both the Philadelphia and Newark airports so I often search for flights out of both. Let’s say I want to go on a ski trip to Colorado. Now there are several mountain towns in Colorado that you can fly into so instead of making multiple searches I look up Philadelphia or Newark to Aspen, Vail, Hayden (Steamboat), Telluride, and Montrose Colorado and get the following results:
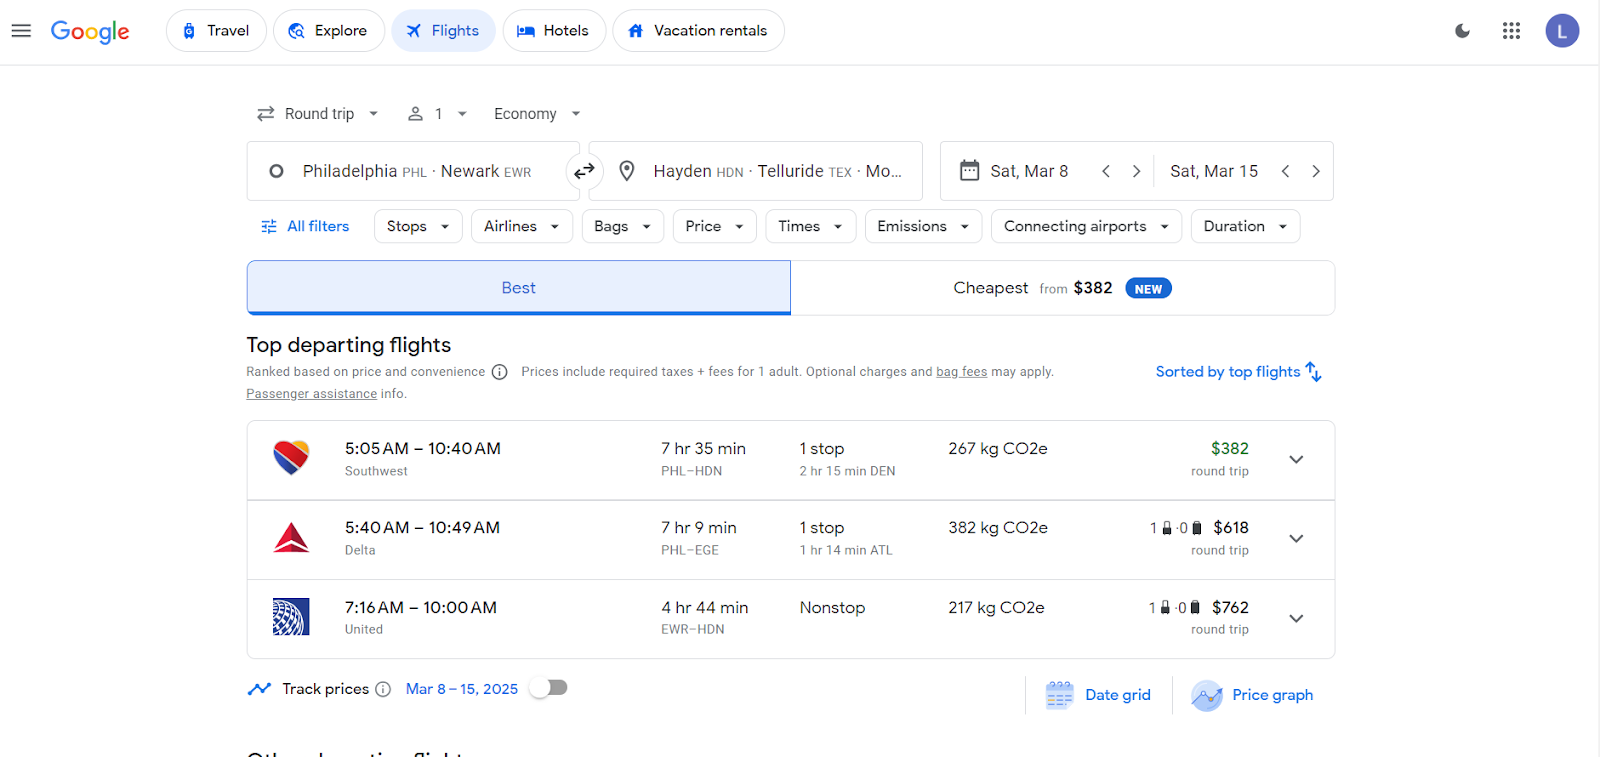
As you can see the cheapest option by far is to fly into Hayden Colorado for the dates I selected. I can also play around with the dynamic calendar which will show the results for my search across different days.
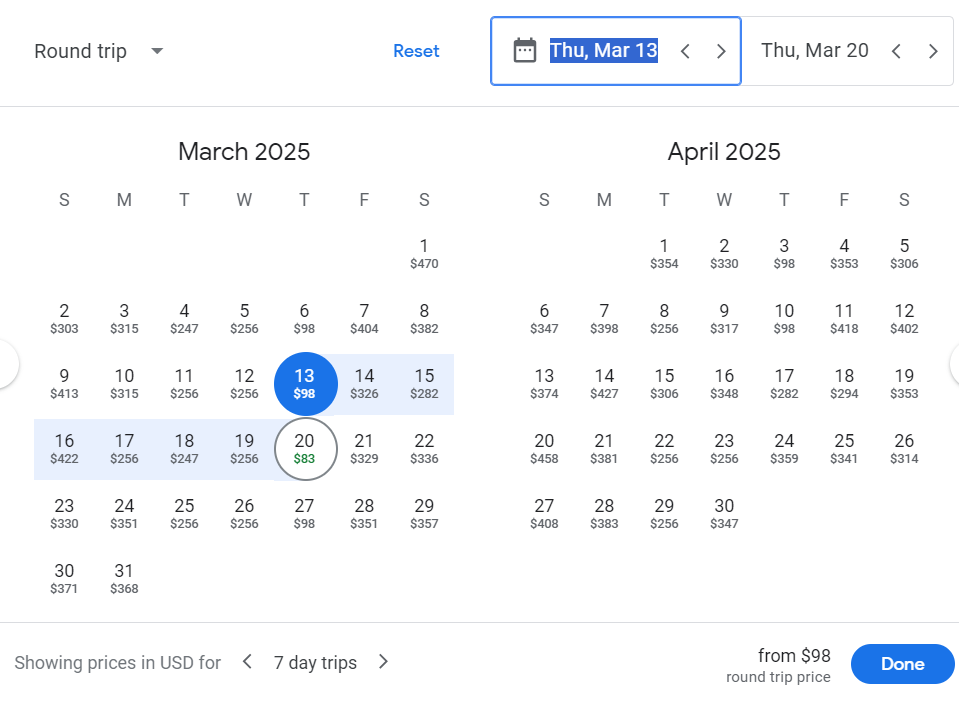
On the dynamic calendar, I can see that the cheapest days to go are actually March 13th to the 20th for only $98 which is an incredible deal.
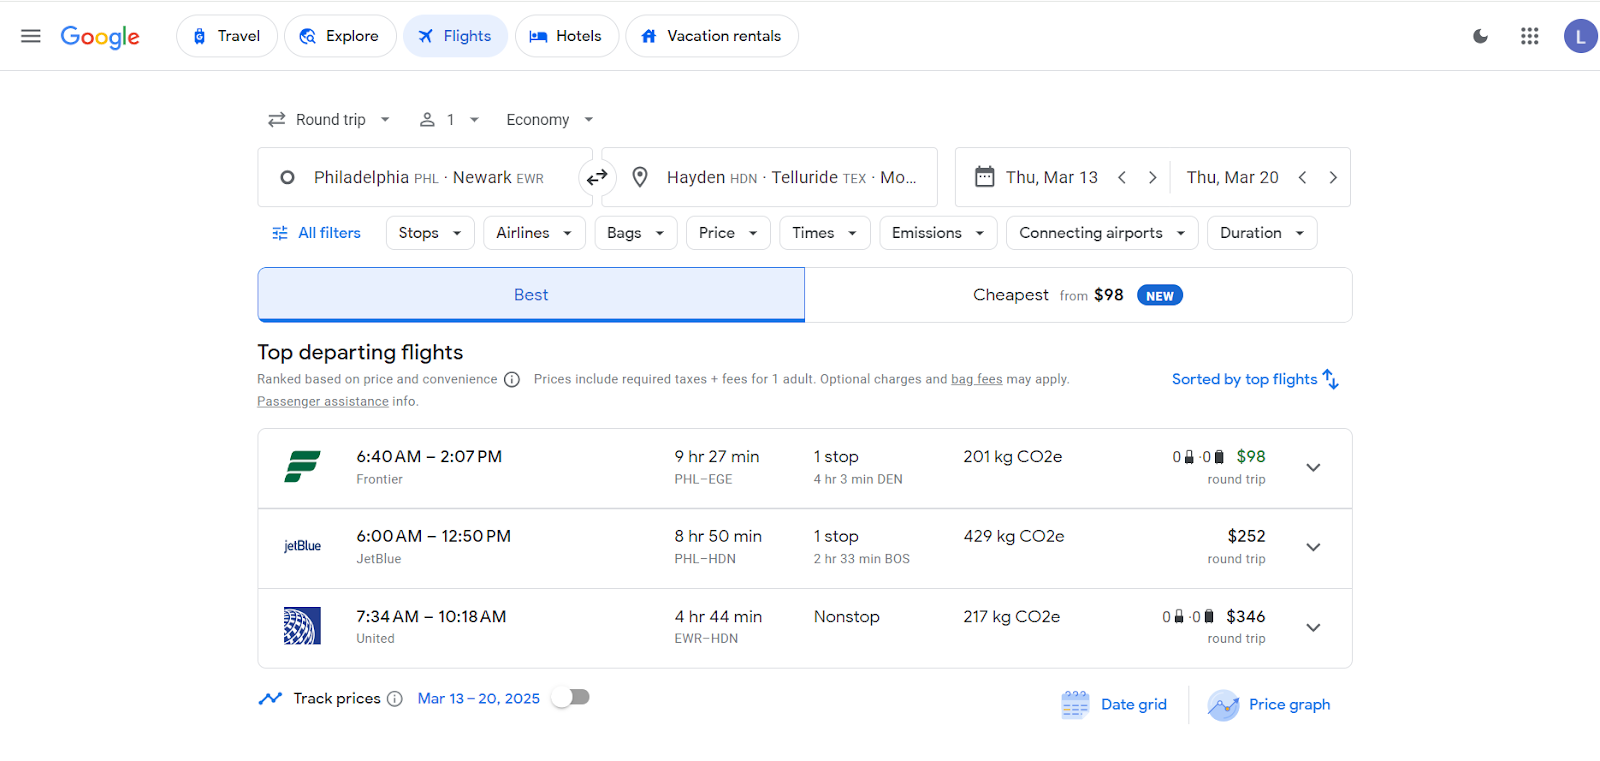
As you can see, this deal is actually to Vail. By searching multiple origin and destination airports you can save a lot of time and find some of the best deals for the trip that you want to take!
Tip 5: Use Filters to Maximize Your Search
In the Getting to Know Google Flights section, I explained that when you search there are many different ways that you can sort the results. The different filters can be selected under the airport and date information:
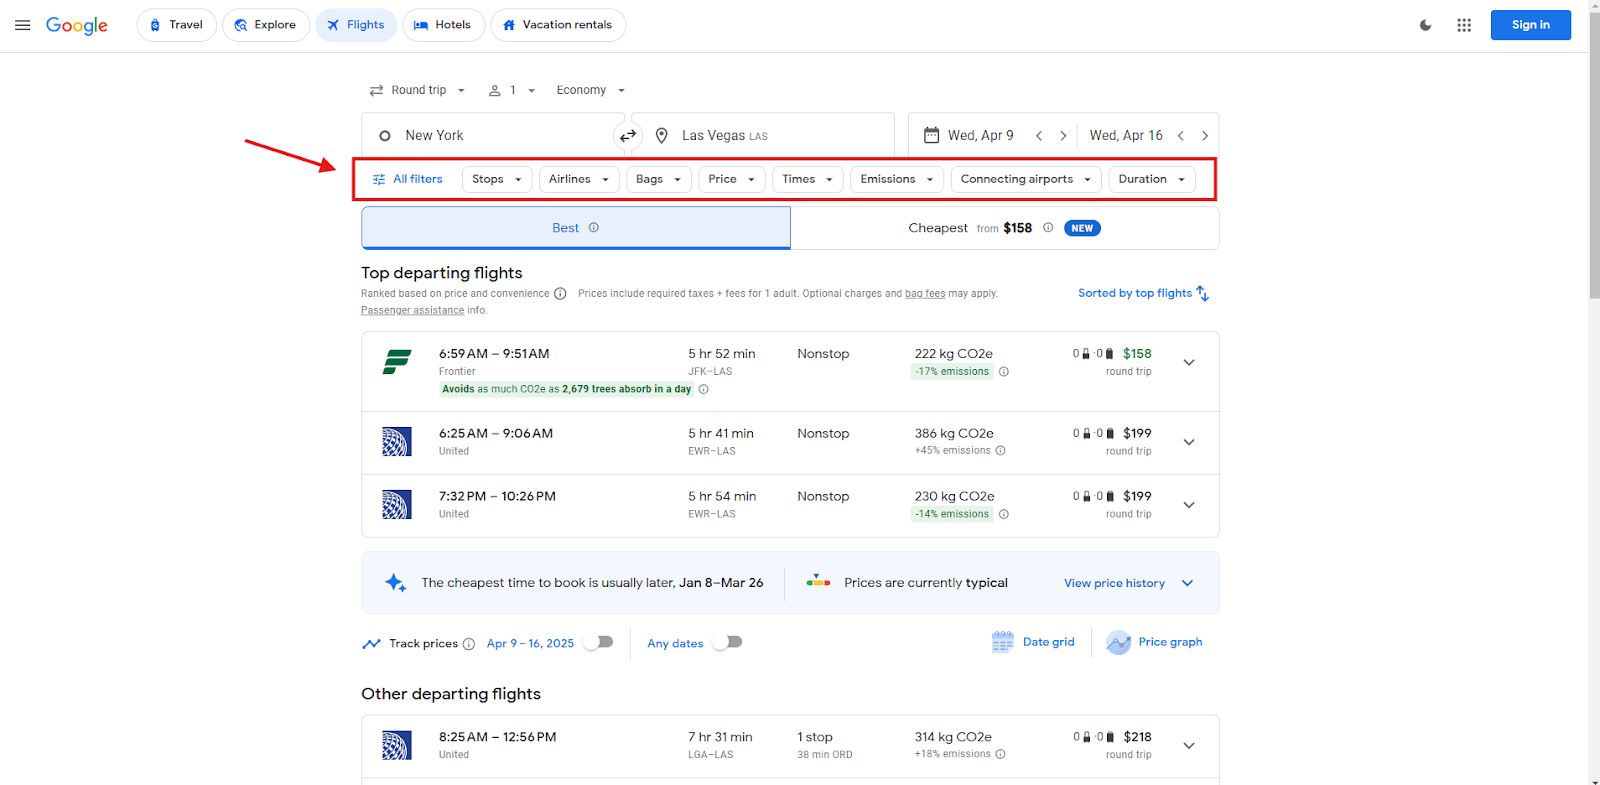
These filters come in handy when you need to fly at a certain time or you want a nonstop flight. Here is a quick overview of the filter options and how I like to use them:
- Stops: This allows you to select how many stops you are okay with. If your airport doesn’t have a direct flight to your destination non-stop will not be able to be selected. If you want to know what cities have nonstop flights from your departure airport check out this website: https://www.flightconnections.com/
- Airlines: In my opinion, this filter is significantly underappreciated. It enables you to refine your search by specific airline(s) or by airline alliance. Filtering by alliance is particularly valuable, as many travelers work on building loyalty within a specific alliance to maximize their status-earning potential.
- Bags: Number of carry-on and checked bags included in the ticket.
- Price: Set a price limit
- Times: Filter by departure and/or arrival times. I use this a lot when I am trying to fly out on the same day that I have to work. I will filter for flights leaving after 6 pm.
- Emissions: This filter can sort flights by the least emissions generated. A pro tip is that if you are comparing two nonstop flights the one with the lower emissions either has a newer and/or larger plane which can mean more modern amenities such as seatback entertainment screens.
- Connecting Airports: Lets you filter two things. You can set a filter on connection time or you can filter by connection airports. You might think, “Who cares what airport I have layover in?”, but trust me all airports are not created equal.
- Duration: This filter is the least useful in my opinion. A flight between two airports is going to take pretty much the same time no matter what airlines you fly. You can already filter how many stops and how long you want a layover to be so I don’t use this filter at all really.
Tip 6: Book Directly with the Airline
When you go to book a flight with Google Flights you will usually see several booking options. This includes the airline’s website itself as well as 3rd party travel companies:
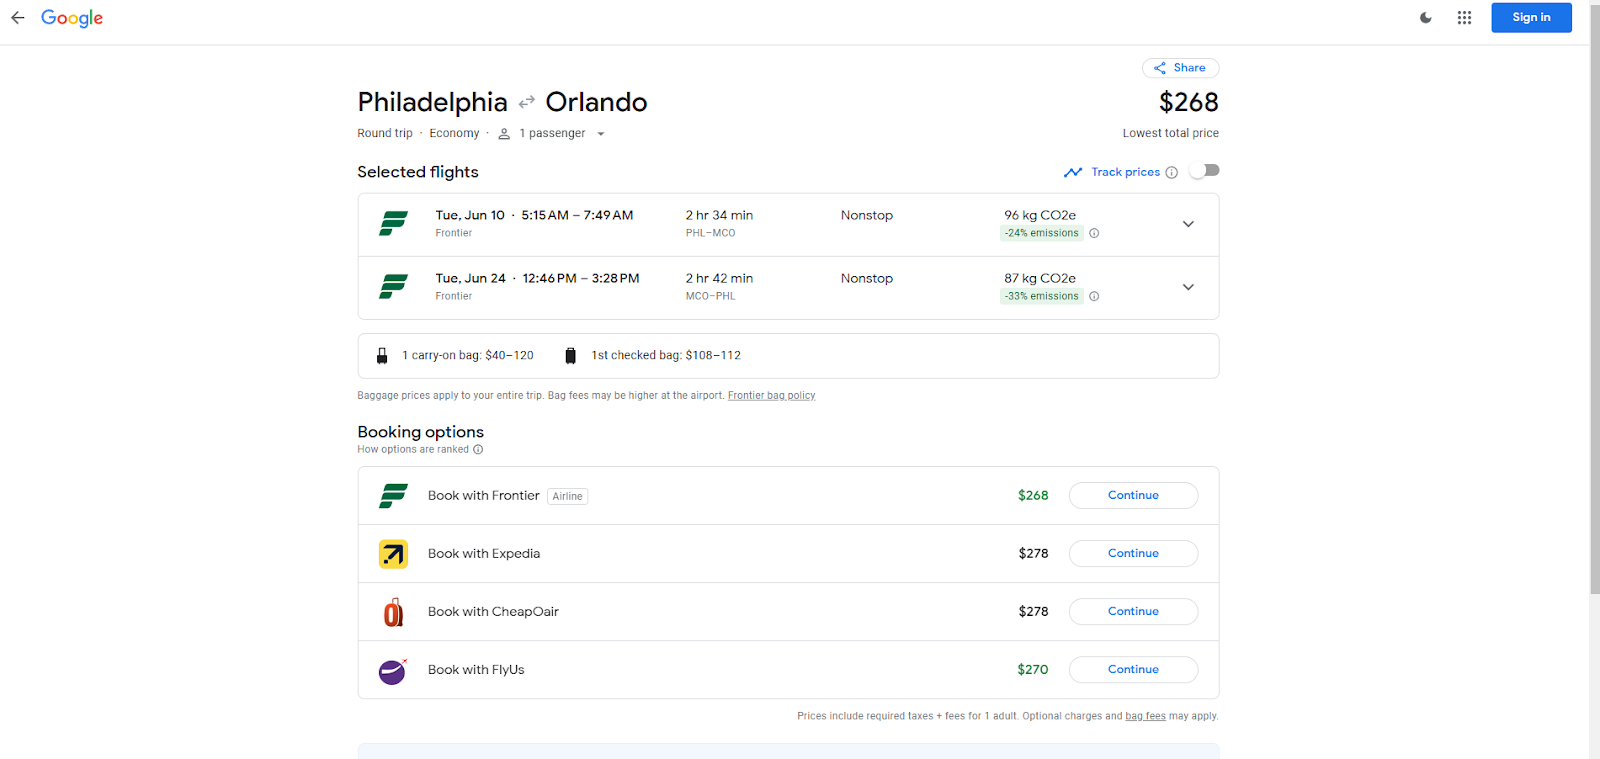
While the airline’s website is the cheapest option 90% of the time, other websites such as FlyUs or CheapOAir might show a lower price. My opinion is that you should almost always book your flight directly with the airline and most travel experts agree on this.
I recommend booking flights directly with an airline for one main reason. Airlines offer far superior customer service. I know what you are thinking – “Yeah right airline customer service is awful”. While I am sure that everyone has a story about a time they were wronged by an airline, their customer service is usually far better than 3rd party travel companies because to put it simply these companies aren’t the airline. It often takes them longer to solve problems that an airline agent would easily fix. If you need to cancel your trip or change your flight it is often far easier to work with the airline directly.
Now there is one big exception to this rule: credit card travel portals. Many credit cards such as Capital One and Chase offer you more points on money spent on flights if you purchase flights through their travel portals. I think in this case the pros outweigh the cons and if you have a travel credit card this is a great way to earn more points for free travel.
Tip 7: Use Google Flights in an Incognito Window
I do almost all of my travel planning and booking in an incognito window. This includes Google Flights as well as hotel booking platforms and any other travel research. Why you may ask? Well in my opinion airlines and hotels will sometimes increase the price on you based on your search history.
Travel companies and airlines don’t explicitly admit to doing this and whether they do or not is a highly debated topic. It is true that flight and hotel prices can change on a daily basis, but let me tell you about a time I experienced this first hand.
I was looking at flights to Hawaii and not using an incognito window. I had to go to work so I decided to check on the flight a few hours later and it had gone up around $30. This felt wrong. I thought – “How can a flight change prices so fast”. I called my mom and asked if she could look for the same flight, but search in an incognito window. When she searched the flight it came up for her at the original price I saw earlier in the day. Since that day I have always opened up Google Flights in an incognito window.
To open an incognito window in Chrome simply click the menu button next to the address bar and select “New Incognito Window” or you can press CTRL + SHIFT + N on your keyboard.
Tip 8: Create Multi City Trips
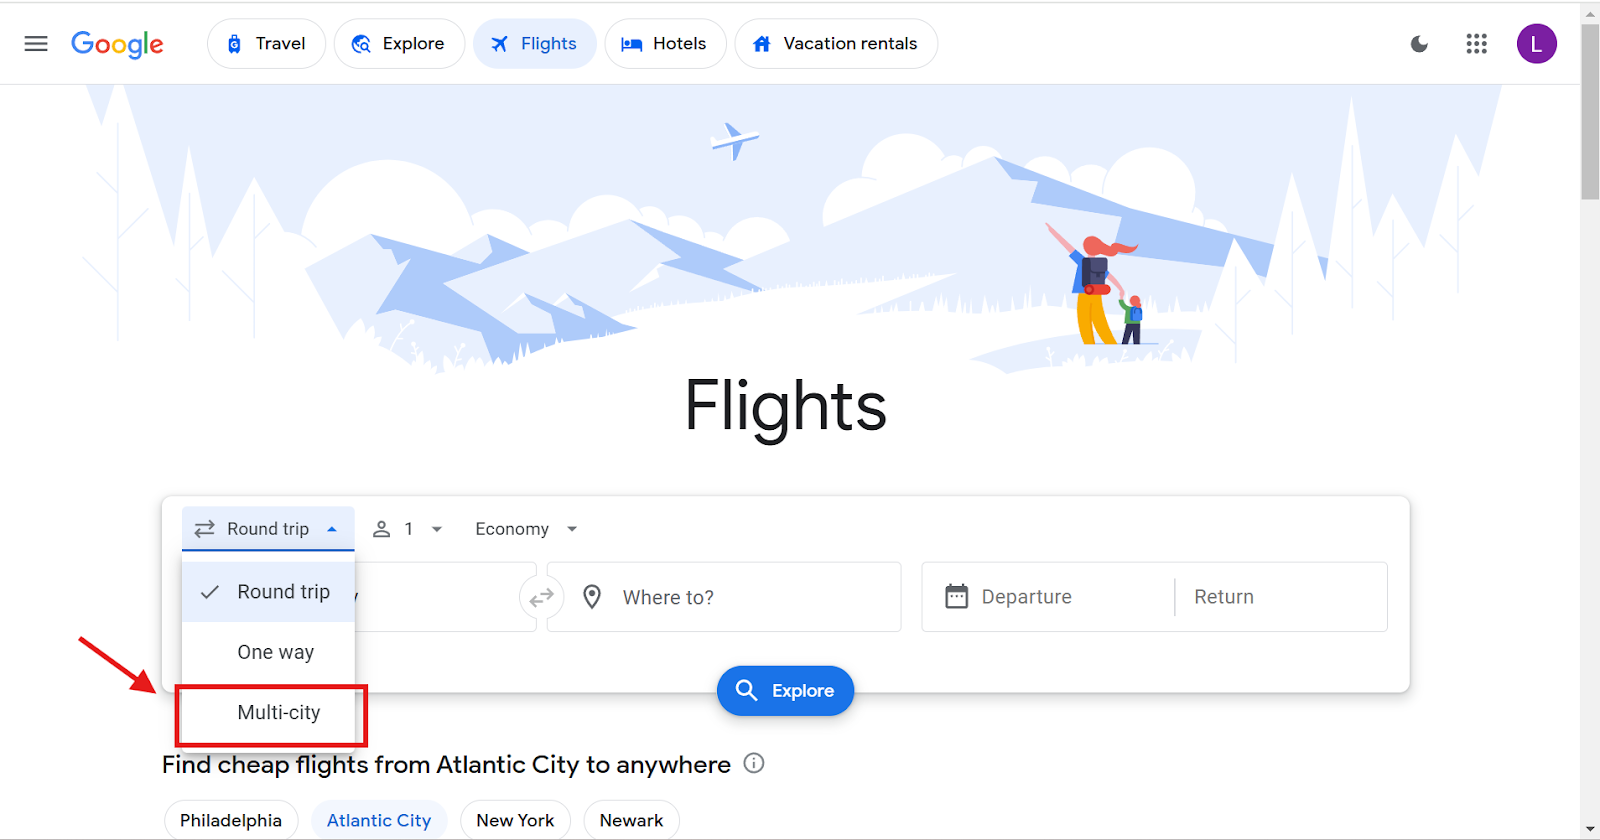
My final tip for Google Flights is to use the multi-city option to seamlessly plan flights for a trip that requires flying to more than one destination. This tool allows you to plan flights with multiple one-way legs, often proving more cost-effective than booking multiple round trips. To start a multi-city search, change your trip type from round trip to multi-city:
The multi-city search is just like a normal search except you can enter up to 5 one-way flights to search at a time:
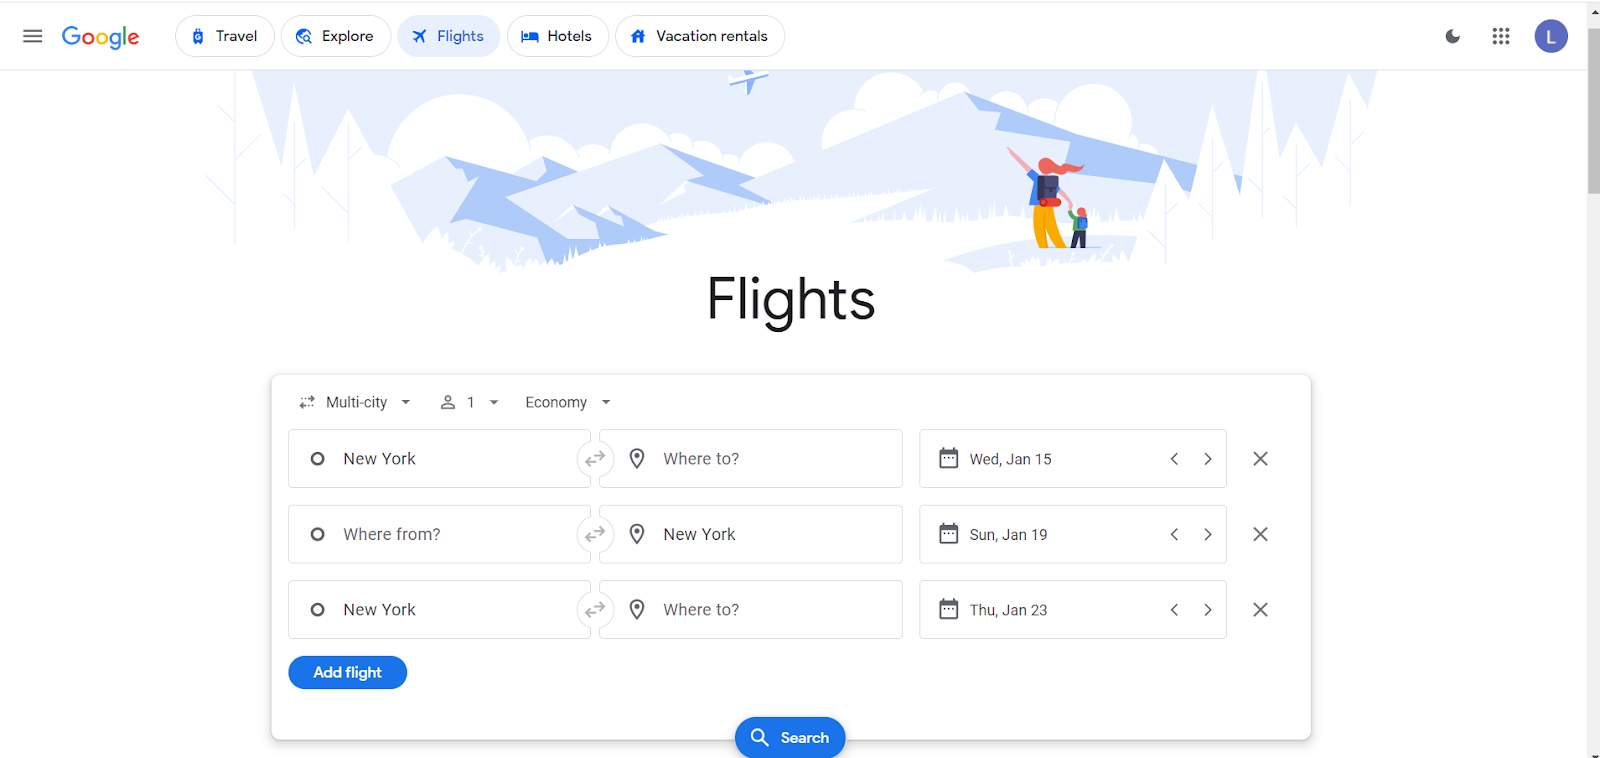
For example, let’s say that you live in LA and want to spend two weeks in Asia. You want to do one week in Japan and one week in South Korea. Instead of booking two roundtrip tickets, it makes much more sense to book three one-way tickets. Once you make your search it shows you different itinerary options for your whole trip:
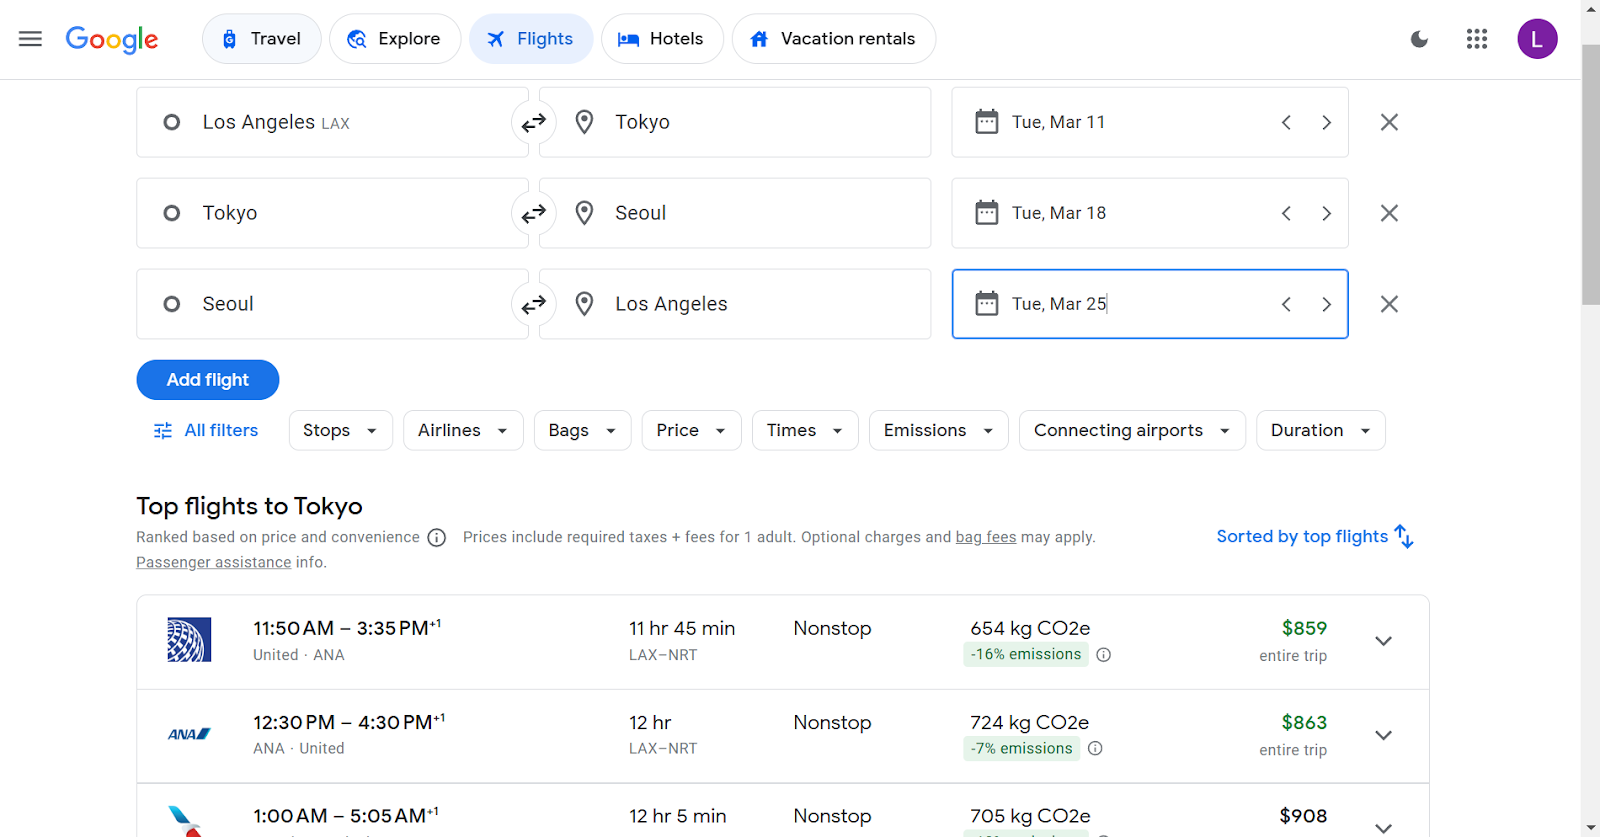
Most multi-city itineraries require you to book flights on several different airlines, but overall it is a fanatic option for planning flights for a complex trip.
FAQs
What is a Self-Transfer Ticket?
Sometimes a flight with a connection might say this underneath of it:

This just means that two or more flights on your itinerary are on two different airlines that are not partners. This means that you have to treat these flights like two separate flights. I am planning on writing a post in the future going more in-depth about whether this is worth it or not, but the short answer is that it usually isn’t unless the price is dramatically cheaper.
What is the Google Flight Price Guarantee?
Sometimes you might see an icon next to the flight that says price guarantee. Google Flights does have a policy where they will guarantee the price that you are paying for your flight will not go down. If the price of your flight does drop more than $5 Google will pay you the difference. This feature seems to be rarely offered and I have only seen it a few times during all my time spent on Google Flights, but if you can take advantage of it I say go for it.
Read more about the terms and conditions here: https://support.google.com/travel/answer/9430556?hl=en
Is Google Flights always going to show the cheapest option?
From what I have seen Google Flights displays the cheapest option for over 90% of the flight searches that I have done. Now it’s always good to double check just to make sure you are getting the best deal so sometimes I will check Skyscanner to see if Google Flights missed anything.
Is Skyscanner the same thing as Google Flights?
The short answer is kind of.
They share many similar features and both generate similar search results, however, I prefer Google Flights for several reasons. My main reason is that Skyscanner has ads which makes the interface feel overwhelming and crowded. I find the Google Flights interface to be a bit more user friendly and streamlined. However, everyone is entitled to their personal preferences and Skyscanner is another great tool for every traveler to have in their toolkit.
If You Liked this Post Share it Below:

